In this blog post, I’d like to introduce you to a tool I’ve been working on called Aegis. It’s a serverless SSH certificate authority (CA) built on AWS Lambda. In simple terms, it issues short-lived, signed certificates using OpenID Connect (OIDC) for authentication and authorization. I’ll walk through why I built it, what problems it solves, and the design decisions I made along the way.
I won’t be covering SSH certificates in depth—there are already many great blog posts on that topic. I really liked this one in particular!
What Are SSH Certificates?
Most people know SSH keys as a private and public key pair that lets you securely access remote machines, but they have some limitations. SSH keys are static, long-lived credentials, which raises the risk of leaks. Managing public keys at scale can also get pretty cumbersome. (No, my small homelab and a few Minecraft servers do not exactly count as “scale,” but hey, it is still fun to pretend.)
SSH certificates solve this by introducing a certificate authority (CA) that signs your public key.
- Certificates limited time-to-live (TTL) before expiring.
- Specifies which users/groups (called principals) are used to map access on targets
- Can include metadata and enforce permissions through critical options and extensions
Here is a sample of a key generated by Aegis that includes Unix user as its Principals. This allows me to access target machines by logging in as one of these users.
~/.ssh/aegis-cert.pub:
        Type: ssh-ed25519-cert-v01@openssh.com user certificate
        Public key: ED25519-CERT SHA256:FTTxKZ7yYfpoNn+7+cWaK7bexetieEYLi/R3YgvRm+k
        Signing CA: RSA SHA256:erKJhTRIegd9W4kmJrAIBQrCAL610EG0m6AWRmJoAVU (using rsa-sha2-256)
        Key ID: "user-cert-20250426-023401"
        Serial: 0
        Valid: from 2025-04-25T22:34:01 to 2025-04-26T22:34:01
        Principals:
                admin
                ansible
                seb
        Critical Options: (none)
        Extensions:
                permit-X11-forwarding
                permit-agent-forwarding
                permit-port-forwarding
                permit-pty
                permit-user-rc
Why I Built Aegis
The idea for Aegis came out of a question I faced while experimenting with SSH certificates in my homelab:
How do I generate my own short-lived SSH user certificates tied to identity, without having to frequent access my CA?
I started looking for existing solutions and settled on the following requirements:
- Short-lived credentials
- OAuth integration for identity mapping
- Simple, hands-off CA management
- High availability
- A simple client for requesting keys
- Auditable
Research: Bless and Its Limitations
I looked into Netflix’s Bless, an open-source tool that signs SSH certificates with AWS Lambda. I really like the serverless model, and it checks some of my requirements, such as high availability and hands-off CA management. However, there were a few aspects I wasn’t fond of.
For one, there was no user client or any other mechanism to interact with the system. I wanted an easy-to-use client that a user could use to authenticate and request a certificate.
Additionally, I found the way the SSH CA certificate was managed a bit odd. In Bless, the CA.pem is built into the Lambda package or passed in via a compressed Lambda environment variable. To protect the CA key, a KMS secret or a secret in the config file is used to decrypt the packaged key when the function is invoked.
The problem with this approach is that by embedding the encrypted key in the artifact or env, you introduce a potential attack vector. If someone gains access to the Lambda package, they could potentially access your CA key. In my opinion this setup creates an unnecessary attack surface. Adding in the risk of human error from manually managing the CA cert in the build process further raises concerns about security.
So, like any good engineer, I stopped my research right there and started building my own solution.
Building Aegis: Inspired by Bless, Extended for Usability
Aegis builds on Bless’s ideas with a few key improvements:
- Secrets Manager stores the CA private key, retrieved at runtime by Lambda at time of use
- API Gateway acts as a front door, handling JWT validation via OIDC and allows for easy client integration.
- CLI Tool Uses the OIDC Device Authorization Flow, perfect for CLI environments
- Audit events stored in DynamoDB enable querying of signing events and active keys.
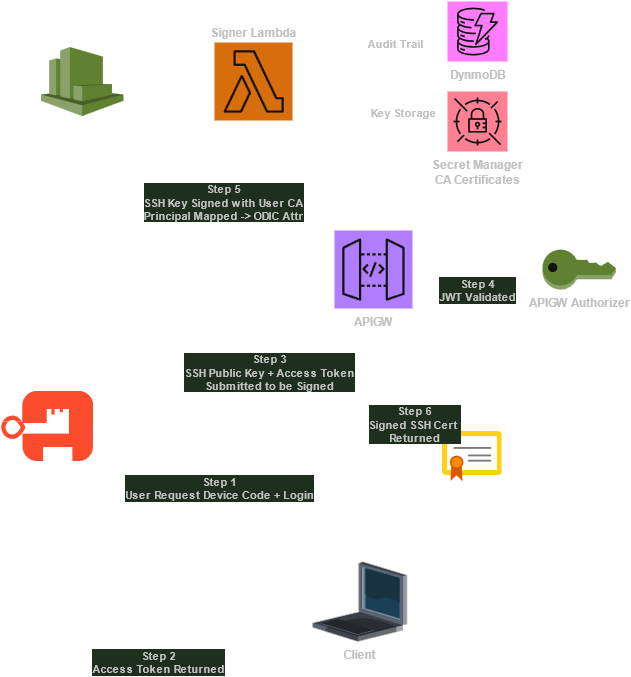
Architecture Walkthrough
Here’s how the pieces fit together starting from the user point of view and diving into the details:
User requests a certificate from Aegis
Aegis comes with a CLI tool, fittingly called aegis. It can be configured either via command-line arguments or by placing a config file at ~/.config/aegis/config. A typical config might look like this:
AUTH_DOMAIN="https://login.rusecrew.com"
CLIENT_ID="YCHWtIM0YraMnq1ptgL0C5Wq0FlSICsv3diLH6LB"
AEGIS_ENDPOINT="https://abc.execute-api.us-east-1.amazonaws.com/prod/sign_user_key"
Running the CLI initiates the flow:
- User requests an access_token using and Oauth Device Code flow.
- A new Ed25519 SSH key pair is generated
- The public key + access_token is submitted to the API for signing
- The returned cert is saved in ~/.ssh
I’m aware that Ed25519 isn’t supported everywhere yet. This is still in the proof-of-concept phase, so please cut me some slack 🙃

Let’s take a quick look at the access token we received during this flow. I’ve omitted some claims for brevity:
{
  "iss": "https://login.example.com/application/o/ssh/",
  "sub": "8975698dsfg09j409gsdqwk",
  "aud": "asdjhCKldfjka",
  "exp": 1745461361,
  "iat": 1745457761,
  "auth_time": 1745457761,
  "name": "seb",
  "unix_groups": ["admin", "ansible"]
}
The access token is a signed JWT provided by our IDP, its claims are cryptographically trusted and can’t be tampered with. This lets the signer safely use any of these attributes to control access. By defining arbitrary claims on the token, we can turn the trusted claims into SSH certificate principals, allowing flexible authorization without needing to touch the target hosts.
Notice the access_token above includes unix_groups, a custom attribute I’ve mapped in my identity provider (IDP). I like the group approach but any claims could be used.
Public Key Submitted for Signing
Once the cli client has obtained an OIDC access_token, the client submits the generated public SSH key along with the access_token to the Aegis signing endpoint (a Lambda function). This request contains:
- SSH public key
- Valid OIDC token
- TTL (default: 24hr)
The JWT is validated by the API using an authorizer on API Gateway. If the JWT is valid, the Lambda is invoked; otherwise, you get a 401. API Gateway (APIGW) comes with native JWT integration, which offloads the responsibility of validating the token to the APIGW instead of handling it inside the Lambda. This was my first time using it, and it is stupid simple to set up.
Check out how this looks in Terraform: we define an aws_apigatewayv2_authorizer with the issuer URL and audience, and then attach it to any route. Done.
resource "aws_apigatewayv2_authorizer" "odic_auth" {
  api_id           = aws_apigatewayv2_api.api.id
  authorizer_type  = "JWT"
  identity_sources = ["$request.header.Authorization"]
  name             = "${local.name}-odic"

  jwt_configuration {
    audience = var.jwt_audience
    issuer   = var.jwt_issuer
  }
}

resource "aws_apigatewayv2_route" "sign" {
  api_id    = aws_apigatewayv2_api.api.id
  route_key = "POST /sign_user_key"
  target    = "integrations/${aws_apigatewayv2_integration.lambda.id}" # Updated target for Lambda integration

  authorization_type   = "JWT"
  authorizer_id        = aws_apigatewayv2_authorizer.odic_auth.id
}
Diving in to the Lambda Signer
We’re finally at the last step—generating the signed certificate… well, almost.
Before we can generate a certificate, we need to determine what principals to include on it.
The core of this step lies in mapping JWT claims to SSH certificate principals. To do this flexibly, I decided to use JMESPath syntax. JMESPath is a query language for JSON that allows us to extract and transform data easily. By using configurable JMESPath expressions, we can dynamically map data from the access token without having to rewrite code every time the schema or requirements change.
This design choice allows us to inject mapping logic into the Lambda function itself, enabling arbitrary access token configurations. It decouples the certificate logic from any specific identity provider, making the system more adaptable and future-proof.
Example:
Given a token with claims like email and groups, and a JMESPath expression like groups[*]:
{
  "email": "alice@example.com",
  "groups": ["admin", "dev"]
}
The resulting SSH certificate will include the groups admin and dev as valid principals:
admin
dev
The logic can be found in this file internal/signer/principals.go
On a related note, I ran into a bug where the Lambda function needs to reparse the JWT token instead of relying on the built-in parsing passed to the Lambda function via the events struct. This only affects nested objects in the JWT claims. It was super annoying to debug, but there is an open issue, so hopefully, it will be fixed soon: GitHub Issue #570.
Okay now the principles are mapped we can sign the cert!
I took a stab at how Netflix’s Bless implementation handles the private certificate, so let me explain my approach.
The private user CA is securely fetched from AWS Secrets Manager. By using Secrets Manager, we benefit from a centralized and secure way to manage the key, ensuring it is encrypted both in transit and at rest. Access is tightly controlled through granular IAM roles and resource policies, allowing only authorized services or users to retrieve the key.
To perform the signing operation, Go comes with a fairly verbose library, golang.org/x/crypto/ssh. I will spare you the details of the library but, here is the core function.
func (s *SSHCASigner) Sign(certType uint32, publicKey ssh.PublicKey, principals []string, expiration time.Duration) (*ssh.Certificate, error) {
	now := time.Now()

	var cert *ssh.Certificate
	switch certType {
	case ssh.UserCert:
		cert = &ssh.Certificate{
			Key:             publicKey,
			KeyId:           "user-cert-" + now.Format("20060102-150405"),
			CertType:        ssh.UserCert,
			ValidPrincipals: principals,
			ValidAfter:      uint64(now.Unix()),
			ValidBefore:     uint64(now.Add(expiration).Unix()),
			Permissions: ssh.Permissions{
				Extensions: map[string]string{
					"permit-pty":              "", // Allows interactive shell
					"permit-port-forwarding":  "", // Lets user forward ports
					"permit-agent-forwarding": "", // enable forwarding of ssh agent
					"permit-X11-forwarding":   "", // allow X11 GUI forwarding
					"permit-user-rc":          "", // Allow execution of ~/.ssh/rc on login
				},
			},
		}

	default:
		return nil, fmt.Errorf("unsupported certificate type: %d", certType)
	}

	if err := cert.SignCert(rand.Reader, s.Signer); err != nil {
		return nil, err
	}

	return cert, nil
}
There are some really neat things we can do here be leveraging the ssh.Permissions structure:
- Limit what users can do by removing permit-pty to block shell access.
- Add custom extensions to signal capabilities to SSH wrappers or bastion hosts.
- Use source-address critical option to restrict usage to specific IPs or CIDR blocks.
- Dynamically calculate TTLs based on token claims like group or role.
- Use force-command to make certificates run only a specific command.
Auditing
To add auditability, each signing operation is saved in DynamoDB. This allows us to use the signing metadata to understand which keys are active, when they expire, for whom they were issued, and for which principals. This data is useful and could be consumed by downstream services for alerts or detections.
Each signing request is logged to DynamoDB, capturing:
- The SSH public key
- The signed certificate
- User identity (sub claim)
- Timestamp of signing
- Expiration time
- IP address
- User-Agent
The DynamoDB uses a composite key:
Partition key: Sub (user identity) and a Sort key: SignedAt
This structure enables easy querying of a user’s signing events within a specific time range for auditing or forensic purposes.
{
  "sub": "9caa1fc11f95db3a10e7b22992aef",
  "signed_at": "2025-04-24T01:21:17Z",
  "expires_at": "2025-04-25T01:21:17Z",
  "aud": "YCHWtIMsv3diLH6LB",
  "certificate": "ssh-ed2Gcp/VOc4leGAE83oGa+czA==",
  "public_key": "ssh-ed25519 AAA6LrhaY2l",
  "principals": ["seb"],
  "source_ip": "72.63",
  "user_agent": "Go-http-client/2.0"
}
For example we can grab all keys signed in the last 24hrs
aws dynamodb scan \
  --table-name AegisSigningEvents \
  --filter-expression "signed_at BETWEEN :start AND :end" \
  --expression-attribute-values '{
    ":start": {"S": "'$(date -u -d '25 hours ago' +%Y-%m-%dT%H:%M:%SZ)'"},
    ":end": {"S": "'$(date -u +%Y-%m-%dT%H:%M:%SZ)'"}
  }'
Done Yapping
You now have ephemeral, identity-bound SSH credentials—automatically issued and ready to use. This model dramatically reduces key sprawl and improves traceability, while still being lightweight enough for homelabs.